How to Use the [UDI] Label Component
Route: Label Generator - [ How to Use the [UDI] Label Component ]UDI (Unique Device Identification) is the abbreviation for GS1 Unique Device Identification. Currently, UDI is mainly used for identifying medical devices, so it is also referred to as the "Unique Medical Device Identification". DoingLabel’s [UDI] label component is a tool for creating [GS1 Unique Device Identification].
Add UDI display to a label
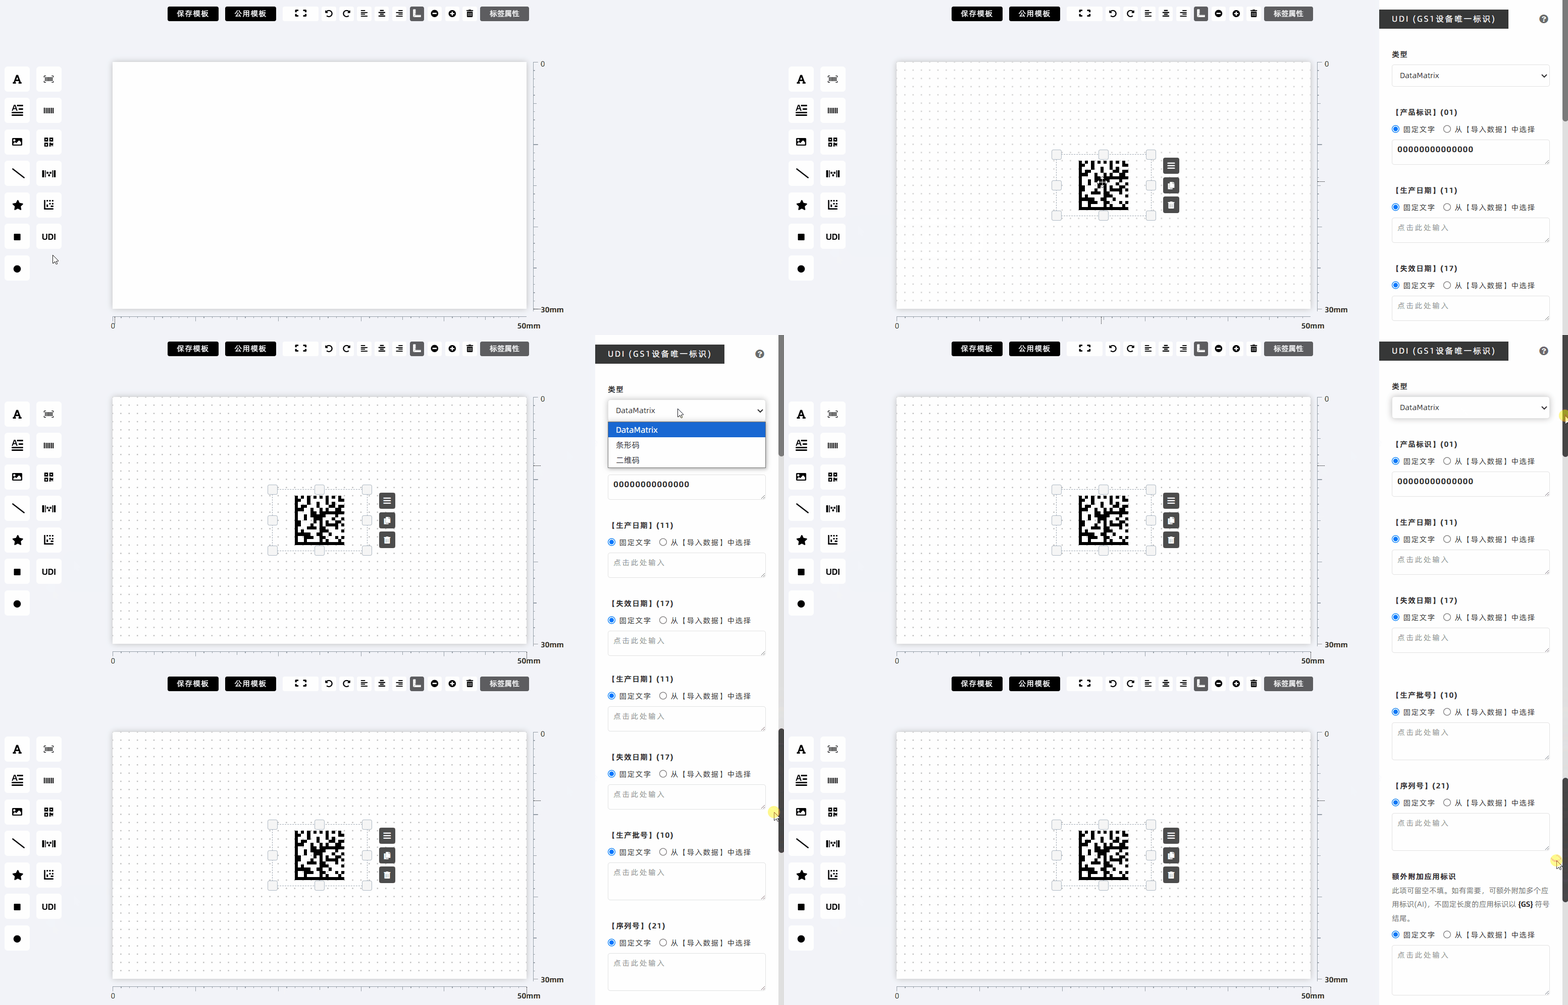
Go to the [Edit Label] panel and click the [UDI] component button.

Editing GS1 UDI Application Identifiers (AIs)
In compliance with GS1 UDI rules, the [UDI] label component allows you to edit five core Application Identifiers (AIs): Device Identifier, Production Date, Expiration Date, Batch Number, and Serial Number. Their specifications are as follows:
| Application Identifier | Code | Requirements | Description |
| Device Identifier (DI) | 01 | Enter a 14-digit number | Used to identify the product; it is an ITF14 (GTIN-14) commodity packaging identification code. |
| Production Date | 11 | Enter a 6-digit date (format: YYMMDD) | Represents the date of manufacture (e.g., "240510" for May 10, 2024). |
| Expiration Date | 17 | Enter a 6-digit date (format: YYMMDD) | Represents the expiration date (follows the same "YYMMDD" format as the Production Date). |
| Batch Number | 10 | Maximum 20 characters | Alphanumeric characters are allowed (no length restriction other than the 20-character limit). |
| Serial Number | 21 | Maximum 20 characters | Alphanumeric characters are allowed (no length restriction other than the 20-character limit). |
- Important Note: You do not need to manually add the AI code (e.g., "01", "11") at the beginning of the input— the program will automatically append the corresponding AI code.
- Mandatory vs. Optional: Only the Device Identifier is a mandatory field; the other four fields can be filled in based on your business needs.
GS1 UDI Carrier Types
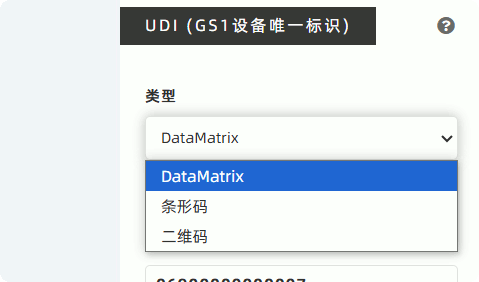
The "UDI Carrier Type" refers to the display format of the UDI. DoingLabel supports three carrier types:

| Carrier Type | Characteristics | Recommendations |
| DataMatrix | Small size (even for full UDI content) | Highly Recommended—ideal for devices or components with limited space (common in medical device labeling). |
| Barcode | Requires significant horizontal width; may be difficult for scanners to read if too wide | Not Recommended—poor space efficiency and potential scanning issues. |
| QR Code | Size between DataMatrix and Barcode (smaller than barcode but larger than DataMatrix) | Optional—use only if required by your business (less space-efficient than DataMatrix). |
DoingLabel’s Suggestion: Prioritize DataMatrix for UDI generation. Use QR Code only if business rules mandate it; avoid using Barcode for UDI.
Adding Additional Application Identifiers (AIs)
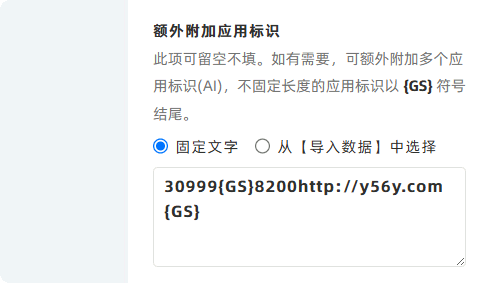
Besides the five standard AIs defined by GS1 UDI, you can add extra AIs if needed: Enter the additional AIs in the [Append AI Data] input box (see the diagram below for reference).

Rule for Variable-Length AIs
If you add variable-length AIs, you must append the {GS} separator after each variable-length AI. However, the {GS} separator is not required if the variable-length AI is placed at the end of the input. For a complete list of GS1 Application Identifiers, click to visit the official GS1 website: https://ref.gs1.org/ai .
Batch UDI Generation
To generate multiple unique UDIs in batches:
- Import batch data: In the [Import Data] module, import the data required for UDI generation in bulk.
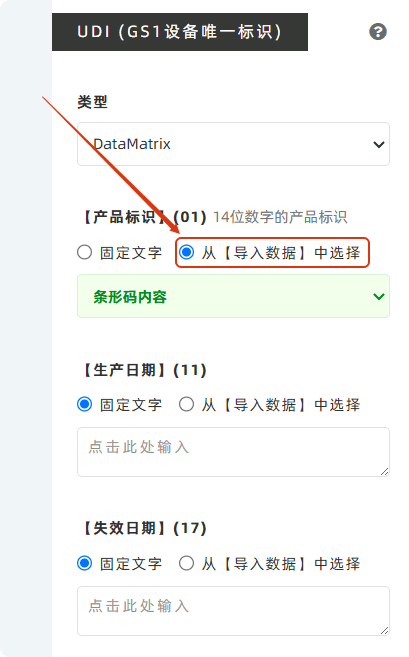
- Bind data to UDI component: Edit the [UDI] label and select [Dynamic text, from Import Data] for each input field (to link UDI fields to the imported data).
- Export in batches: Go to the [Export Labels] module, select an appropriate export method. The program will automatically generate corresponding UDIs dynamically based on the data list in [Import Data].

How to Generate Serial Numbers
To generate serial numbers for barcodes:
- Go to the [Import Data] module.
- Move your mouse to the column header of the list where you want to add serial numbers.
- Click [Fill Serial Numbers] to generate sequential serial numbers.
Supplementary Information
- Learn More About UDI: For guidance on creating GS1-compliant UDI, click to view [How to Create GS1-Standard UDI?].
- Feedback: If DoingLabel’s [UDI] label component fails to meet your business requirements or if you have suggestions, please provide feedback to DoingLabel.
- Kindly refrain from reposting this article unless you have obtained permission.
- This is a translated article. Should you find any translation mistakes or content errors, please refer to the Original Article (Chinese), which takes precedence.
- Due to ongoing version iterations, the feature details and interface screenshots included in this article may not be updated in a timely manner, leading to potential discrepancies between the article content and the actual product. For the most accurate information, please refer to the features of the latest version.