How to Split Large Volumes of Data into Batches for Label Export or Printing
Route: Usage Tips - [ How to Split Large Volumes of Data into Batches for Label Export or Printing ]The batch export and printing functions are identical across the Label Generator, Batch Barcode Generator, and Batch QR Code Generator. This guide uses the Label Generator as an example, but the operation is similar for the latter two tools.
When exporting or printing a large number of labels, the browser consumes significant memory resources, which will likely cause the browser to freeze—making effective export or printing impossible.
In such cases, DoingLabel recommends exporting or printing in batches. For example, if you need to export 10,000 labels, split them into 10 batches of 1,000 labels each.
How to Quickly Split Data into Batches?
Import full data: Import all your data in the [Import Data] section.
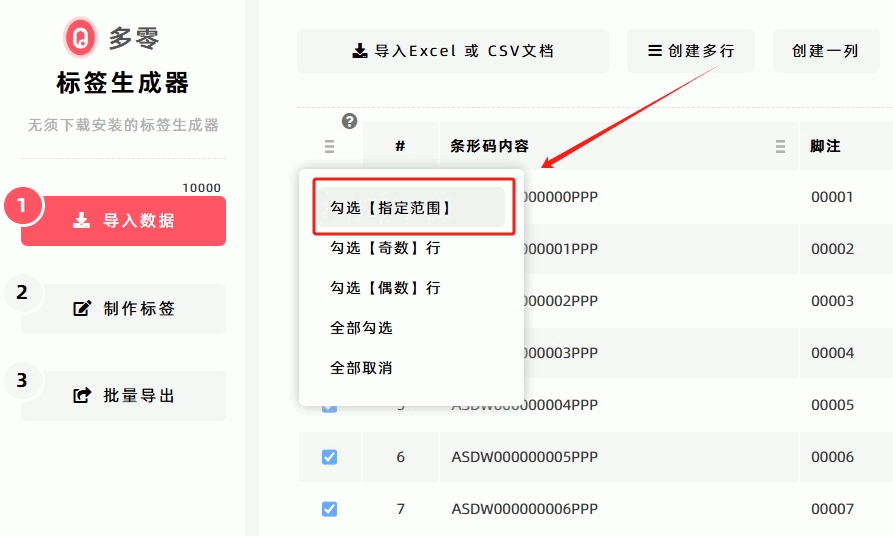
Select a batch of data rows: Use the [Select Data Row Range] function under [Import Data] to select the data rows for one batch.
Export/print the batch: In the [Export Labels] section, export or print the labels. The program will only export/print the selected data rows in [Import Data]; unselected rows will be excluded.
Repeat for remaining batches: Repeat steps 2 and 3—use [Select Data Row Range] to select the next batch of data rows, then batch export or print. Continue until all labels are processed.
As shown in the steps above, the core operation relies on the [Select Data Row Range] function in [Import Data]: it allows you to quickly select data rows for each batch, and the [Export Labels] section then exports or prints the corresponding batch of label files.
Example
Suppose you need to batch export 10,000 labels in PDF format, split into 10 batches of 1,000 labels each:
-
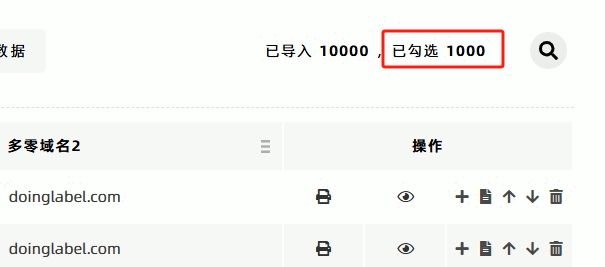
Import 10,000 rows of data in [Import Data].
-
In the header of the first column of the [Import Data] list, click the [Select Data Row Range] button.
-
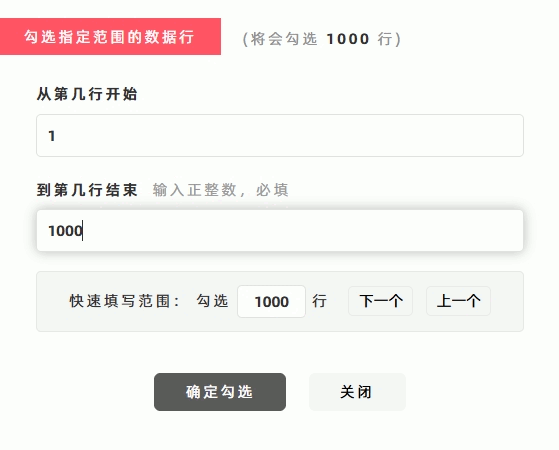
In the pop-up settings window, enter the range for the first batch by specifying [The Starting Row Number] and [The Ending Row Number]. For this example, enter 1 and 1000 respectively.
-
Click [OK] button—the program will automatically select rows 1 to 1000 in the data list.
-
In [Export Labels], click [Export as a ZIP (One Label Per File)] to export the labels in PDF format. The program will only generate and export labels for rows 1 to 1000 based on your selection.
-
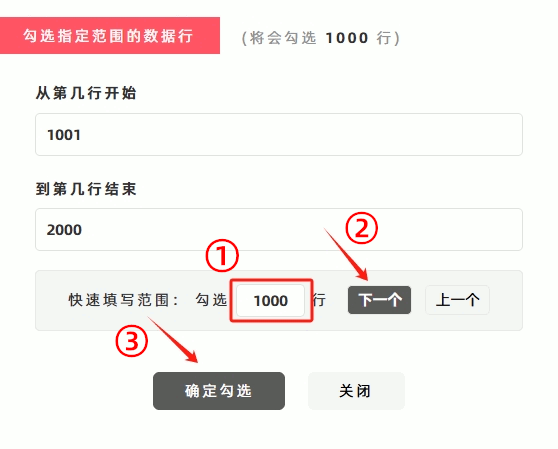
After exporting the first batch, return to [Import Data] > [Select Data Row Range], and enter 1000 in the [Quick Input] field. Click [Next] button—the [The Starting Row Number] and [The Ending Row Number] will automatically update to 1001 and 2000 (the range for the second batch).
-
Click [OK] button—the program will select rows 1001 to 2000.
-
Go back to [Export Labels], click [Export as a ZIP (One Label Per File)], and export the PDF labels. The program will generate and export labels for rows 1001 to 2000.
-
Repeat steps 6 through 8 above until all label files are exported.
- Kindly refrain from reposting this article unless you have obtained permission.
- This is a translated article. Should you find any translation mistakes or content errors, please refer to the Original Article (Chinese), which takes precedence.
- Due to ongoing version iterations, the feature details and interface screenshots included in this article may not be updated in a timely manner, leading to potential discrepancies between the article content and the actual product. For the most accurate information, please refer to the features of the latest version.